In my first blog, ‘Bird Recognition App using Microsoft Custom Vision AI and Power BI’, we looked at the intriguing behaviors and attributes of birds using Power BI. This inspired me to create an ‘AI for birds’ web app’ using Azure Custom Vision along with a phone app using Power Apps and an iPhone / Android platform that could identify a bird in real-time. I created this app to raise awareness of the heart-breaking reality which most birds face around the world.
In this blog, let’s go behind the scenes and take a look at the journey of how this was created.
What is Azure custom vision?
Azure Custom Vision is an image recognition AI service part of Azure Cognitive Services that enables you to build, deploy, and improve your own image identifiers. An image identifier applies labels (which represent classes or objects) to images, according to their visual characteristics. It allows you to specify the labels and train custom models to detect them.
What does Azure custom vision do?
The Custom Vision service uses a Machine Learning algorithm to analyze images. You can submit groups of images that feature and lack the characteristics in question. You label the images yourself at the time of the submission. Then, the algorithm trains to this data and calculates its accuracy by testing itself on those same images.
Once the algorithm is trained, you can run a test, retrain, and eventually use it in your image recognition app to classify new images. You can also export the model itself for offline use.
How does it work?
- Upload images – Bring your own labelled images or use Custom Vision to quickly add tags to any unlabeled images.
- Train the model – Use your labelled images to teach Custom Vision the concepts you care about.
- Evaluate the result – Use simple REST API calls to quickly tag images with your new custom computer vision model.

The Custom Vision Service uses machine learning to classify the images you upload. The only thing that is required to do is specify the correct tag for each image. You can also tag thousands of images at a time. The AI algorithm is immensely powerful and once the model is trained, you can use the same model to classify new images according to the needs of the app.
Prerequisites to create bird recognition app
Here are the prerequisites:
- An account with Custom Vision AI; you can either use the free subscription or use your Azure account.
- A database of images for training the model.
- Enough data to get started.
The Journey of Creating my Custom Vision AI Model
I first visited https://customvision.ai/, then I logged in with the Azure credentials.
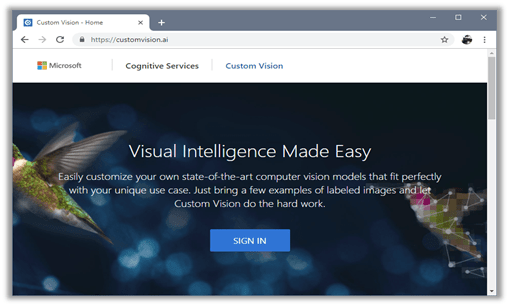
1. I created a new project.

2. I added as many relevant images as possible and tagged them correctly.
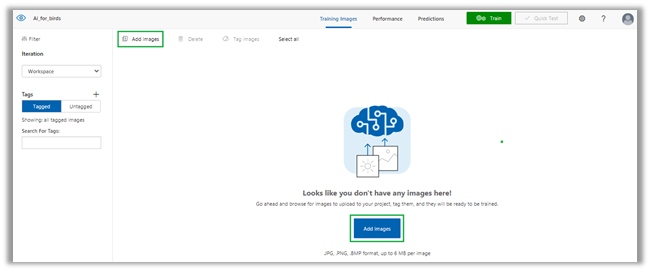
3. I trained my model with 4590 images of 85 different species of birds.
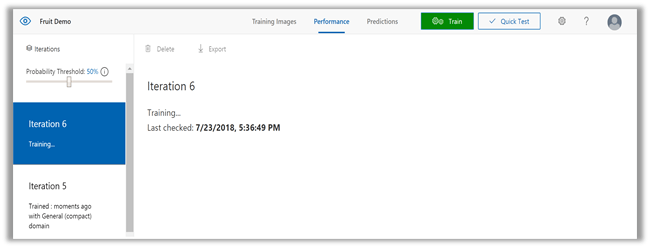
4. Model evaluation using ‘Quick Test’
I calibrated the precision to be higher than 90%. The Precision value increases as you upload and train with more and more images.
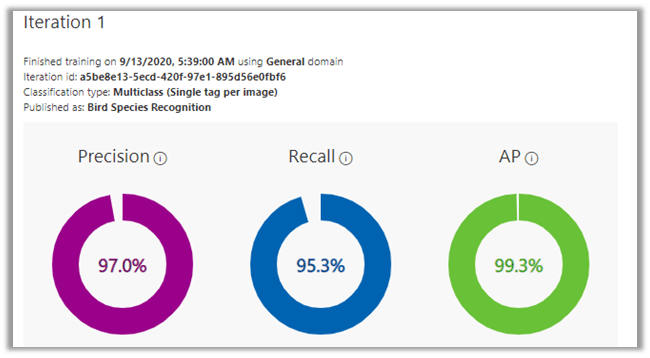
When I trained the model with the new data, a new iteration was created. The accuracy and precision improved over time as I increased the training data set to 1200 images of 85 different species. (We should keep an eye on the precision value during various iterations.) I tested my model during this process using ‘Quick Test’ and deployed it.
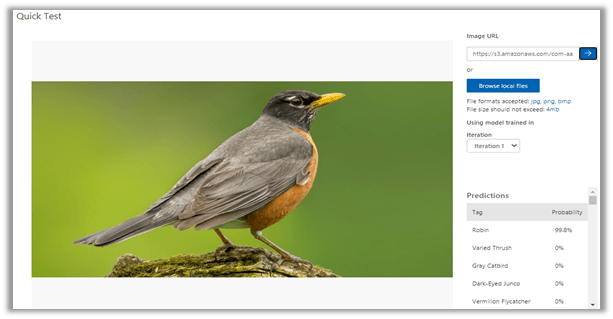
Using the Model with the Prediction API
The Custom Vision AI worked as expected. Then I needed the required keys to create an application using Custom Vision AI.
So, I clicked on the “Gear Icon” (settings) and saved my project ID and prediction key. After that, I got the prediction URL from the Performance tab.

How to Experience the Custom Vision API in Power Apps, Mobile Application, & the Website
1. Power Apps:
The Custom Vision API can be linked to the Power Apps by the “Custom Vision” connector. By providing a few details to the custom vision connector such as “Prediction Key” as well as “Site URL”, you can seamlessly use Custom Vision API in your Power App.
2. Mobile Application (Android and iOS):
In the Flutter Application, we called the Custom Vision API by using HTTP requests as well as Dio Packages. For Power BI Reports part of the mobile app, we embedded the Power BI report iframes into the flutter app by using WebView.
3. Website:
The Custom Vision API is connected to the website via Ajax & HTML tags. On the website, we published the Power BI Report through the HTML iframe. The generated Power BI Embedded iframe is effortlessly compatible with all the browsers.
The possibilities of Cognitive Services and Machine Learning are limitless!
If you have not tried the AI for Birds Mobile app yet, there is no better time! Both (Android & iOS) apps are available to download.
To download this app, please search “AI for Birds” in the Google Play Store, or the Apple’s App Store.
How to Improve your Classifier?
Let’s talk about the ways to improve the quality of your Custom Vision Service Classifier. The quality of your classifier depends on the amount, quality, and variety of the labelled data that you provide and how balanced the overall dataset is.
A good classifier has a balanced training dataset that represents the submitted classifier. The process of building such a classifier is iterative and it’s common to implement a few rounds of training to reach expected results.
The following is a general pattern to help you build a more accurate classifier:
- First-round training.
- Add more images and balance data, then retrain it.
- Add Images with varying background, lighting, object size, camera angle, and style; retrain.
- Use the new Image(s) to test the prediction.
- Modify existing training data according to predicted results.
References
- https://www.customvision.ai/
- https://docs.microsoft.com/en-us/azure/cognitive-services/Custom-Vision-Service/overview
- https://azure.microsoft.com/en-us/services/cognitive-services/custom-vision-service/
- https://docs.microsoft.com/en-us/azure/cognitive-services/custom-vision-service/getting-started-build-a-classifier
Power BI
What is Power BI and what does it do?
Power BI is a business analytics service by Microsoft. It aims to provide interactive visualizations and business intelligence capabilities with an interface simple enough for end-users to create their reports and dashboards.
Power BI is a business suite that includes several technologies that work together to deliver outstanding data visualizations and business intelligence solutions.
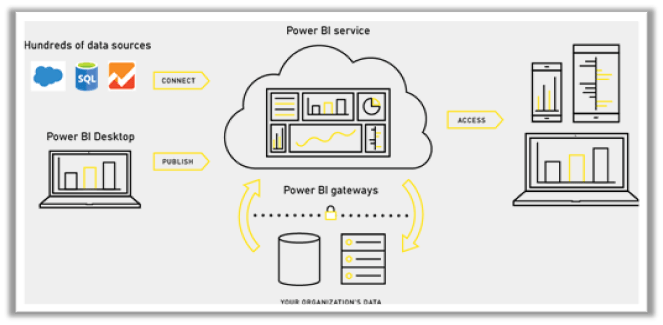
You can use the Power BI Desktop tool to import data from various data sources such as files, Azure source, online services, DirectQuery, or gateway sources. You can use this tool to clean and transform the imported data.
Once the data is transformed and formatted, it is ready for creating visualizations in a report. A report is a collection of visualizations like graphs, charts, tables, filters, and slicers.
Next, you can publish the reports created in Power BI desktop to Power BI Service or Power BI Report Server.
Pre-requisites
Here are the Prerequisites:
- Power BI Desktop App.
- Power BI Pro Account.
The Journey of Creating the Power BI Reports
I installed Power BI Desktop from the Windows Store. You can also download it from this URL: https://powerbi.microsoft.com/en-us/desktop/
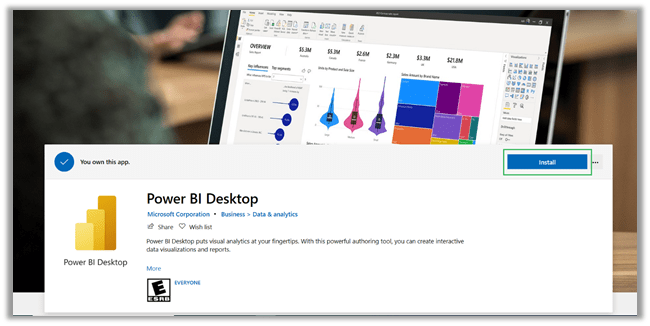
Post-installation, I opened Power BI desktop and then clicked “Get Data” > “Text/CSV”.
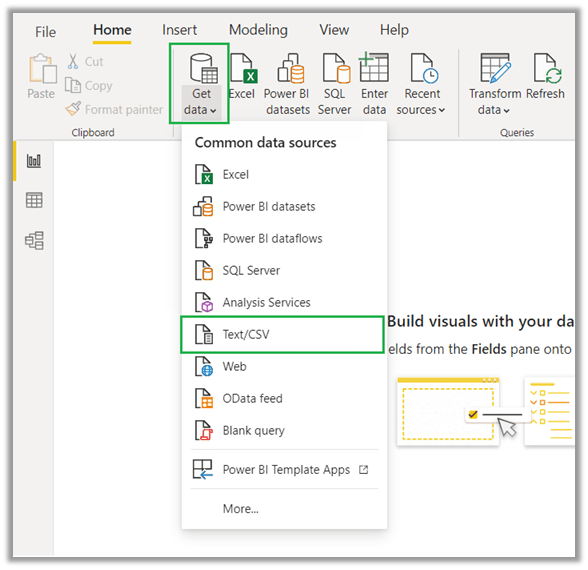
Next, I selected the CSV file by browsing the required folder and then clicked “Load”.

From the visualizations pane, I selected a visual for my report. Then, from the Fields pane, I chose the required column(s) for that visual.
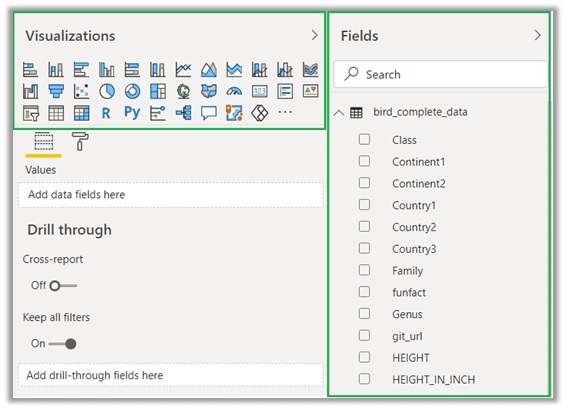
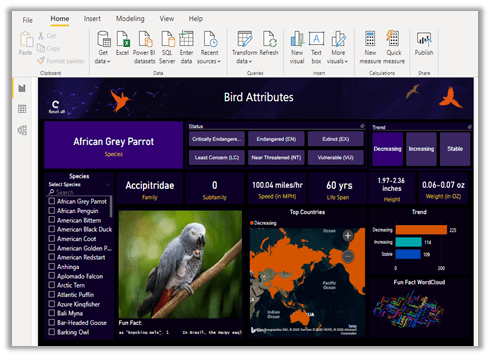
Then, I created a report with the collection of different visuals and slicers by adding the specific columns from the table. You can also modify the visuals, and apply filters to discover more in-depth insights.
The Process of Publishing the Power BI Report
- In Power BI Desktop, I chose to Publish the report on the Home tab. However, you can also go to File > Publish > Publish to Power BI.

2. I signed into my Power BI account.
3. Then I chose the destination from the list (you can also choose “My workspace”) and clicked on the Select button.
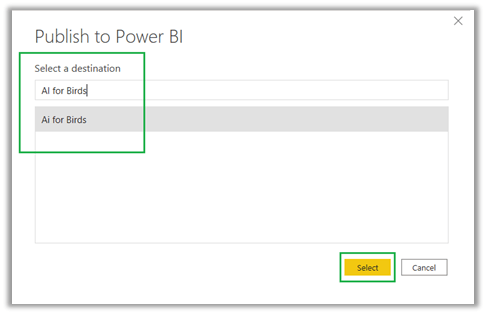
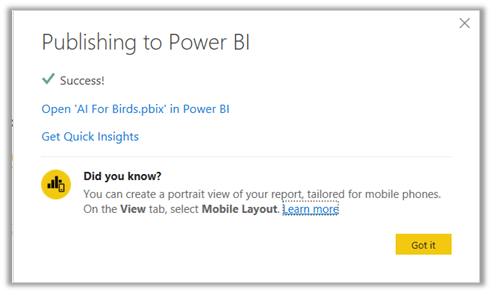
4. Once the publishing was complete, I received a link to my report. I selected the link to open my report using Power BI service.
How did I generate the Embed URL and the iframe?
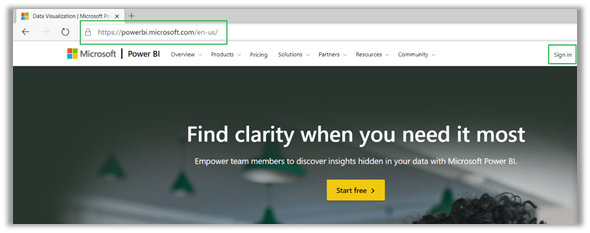
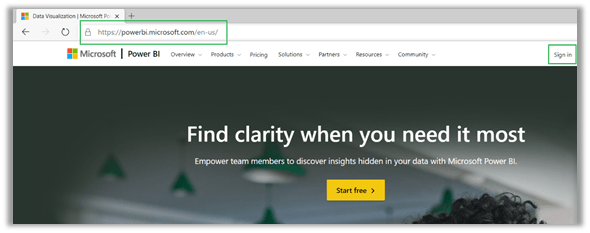
1. To generate the Embed URL and iframe, I signed into the Power BI service (https://www.powerbi.com/).
2. After opening the required report from the workspace, I navigated to the “Share” dropdown > “Embed report” > “Publish to web” to create the Embed URL and the iframe.
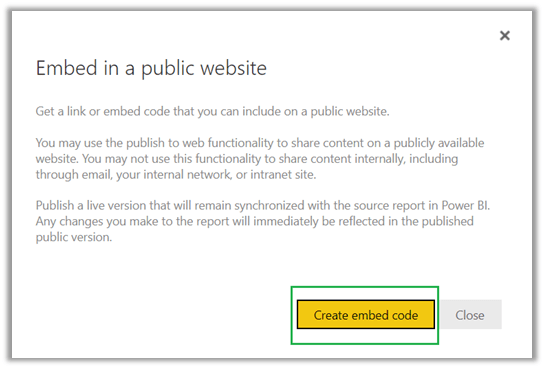
3. Then I clicked “Create Embed Code”.
4. After generating the Embed URL, I selected the required iframe size and copied the generated iframe, so I can use the iframe in my website.
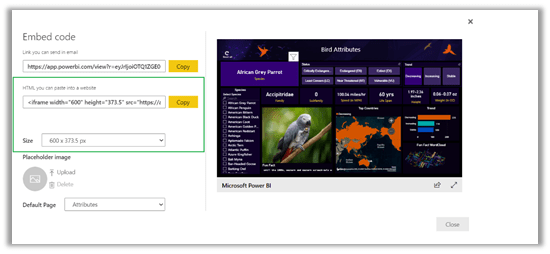
This way, using Microsoft Power BI, I was able to create a highly interactive & customizable report of various bird species from the original data set.
POWER APPS
What is Power Apps?
Power Apps is a suite of apps, services, connectors, and data platform that provides a rapid application development environment to build custom apps of your needs. Apps built using Power Apps provide rich business logic and workflow capabilities to transform your manual business processes to digital, automated processes.
Power Apps also provides an extensible platform that lets pro-developers: programmatically interact with data and metadata, apply business logic, create custom connectors, and integrate with external data.
Using Power Apps, you can create three types of apps: canvas, model-driven, and portal.
To create an app, you start with make.powerapps.com.
- Power Apps Studio is the app designer used for building canvas apps. The app designer makes creating apps feel more like building a slide deck in Microsoft PowerPoint. More information: Generate an app from data.
- App designer for model-driven apps lets you define the sitemap and add components to build a model-driven app.
- Power Apps portals Studio is a WYSIWYG (what you see is what you get) design tool to add and configure webpages, components, forms, and lists.
Prerequisites for Power Apps Development
· A Microsoft 365 Business Premium Account.
My Power Apps Development Process (Canvas App)
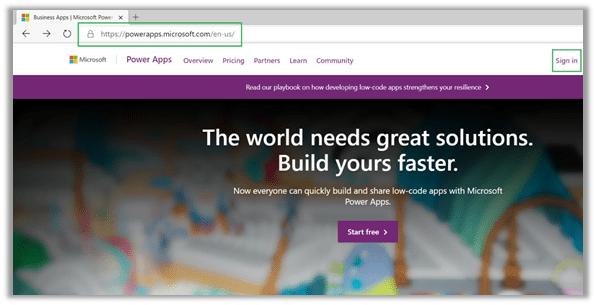
1. I signed in to Power Apps.
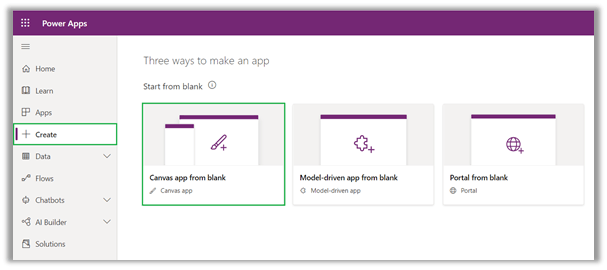
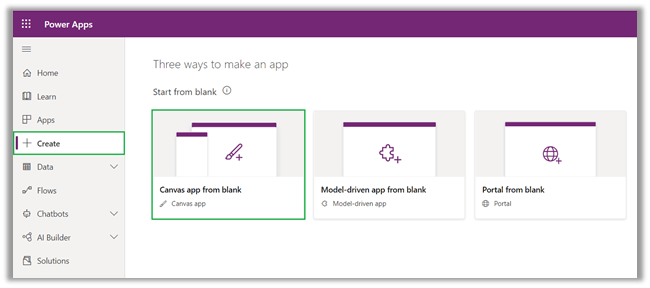
2. I clicked on the Create > Canvas app from blank.
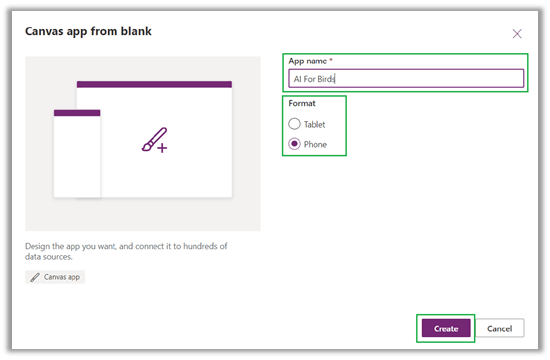
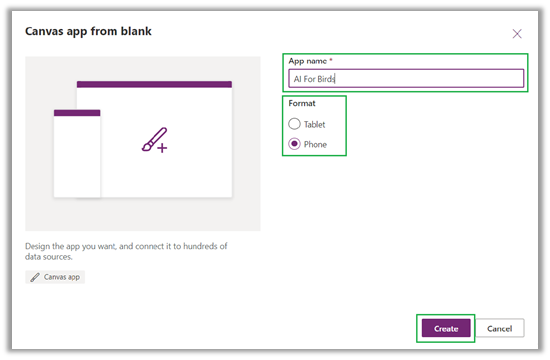
3. After specifying my app name as “AI for Birds” > I selected “Phone” to be the Power Apps Format > and clicked “Create”.
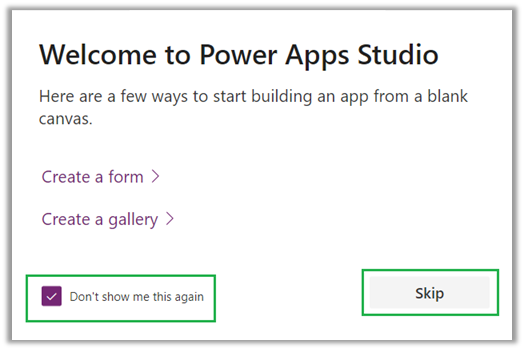
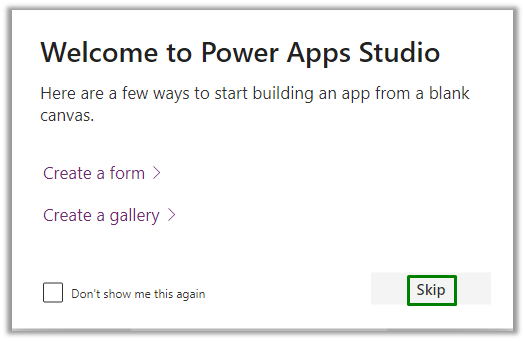
4. I checked “Don’t show me this again” from the pop up > Skip.
5. From the dropdown menu, I selected my Country as “United States” > Get Started.
6. From the blank canvas, I added some new screens and UI elements with proper screen navigations.
Steps to Connect Custom Vision with Power Apps
Power App uses Custom Vision API to detect Bird species with the help of the images. I connected Custom Vision API with Power Apps.
Here are the steps I followed:
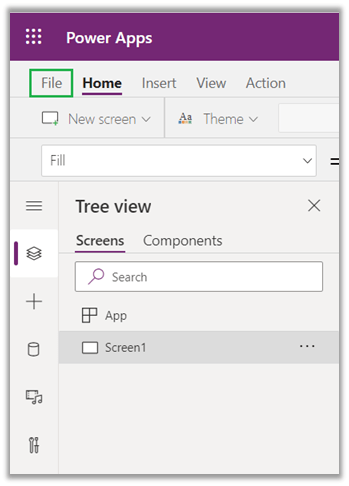
1. First, I clicked the File menu.
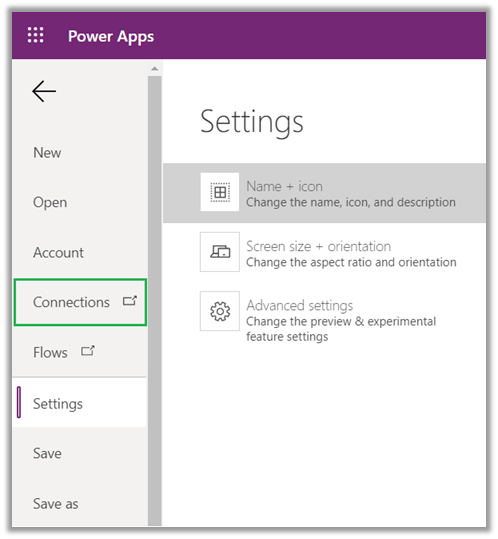
2. Then I clicked on Collections on the left navigation bar.
3. To establish the connection, I clicked on a New connection option from the top navigation bar.
4. On the new connections list screen, I clicked the “+” icon & put my prediction key and site URL.
5. Once the connection was established between the Custom Vision and the Power Apps, I was able to implement the same into the Power Apps.
(Note: The prediction key and the site URL are accessible from the Custom Vision AI website, wherein I created an image classifier.)
Implementing the Custom Vision into Power Apps:
After connecting the Custom Vision to Power Apps, here are the steps that I followed:
- In the image container (in my case, it was “UploadedImage2“), I created a Collection that stores the results of custom vision prediction.
- To store results in the gallery, the following syntax was used:
On click Syntax: ClearCollect (<Name of your Collection to store the predicted results>, CustomVision.ClassifyImageV2(“<Your Project ID>”, “<YourProject name which can be obtained from the Custom Vision website>”, <Your Image Container>).predictions);
Publishing My Power App:
· To publish the Power App, I clicked on File > Save > Publish.
How to Consume Power Apps?
Desktop:
- The ‘AI for Birds’ Power Apps can be downloaded from this link – AI For Birds Power Apps.
- Download the zip file and extract it, open the Power Apps Studio – https://make.powerapps.com/
- Sign up with your Microsoft Office 365 account in Power Apps.
- Click Create > “Canvas app from blank”.
5. After specifying the app name > Select “Phone” to be the format > Create.
6. After Clicking Create, it opens the Power App Studio in a new tab. It shows the steps to start building an app from a blank canvas. Just click Skip.
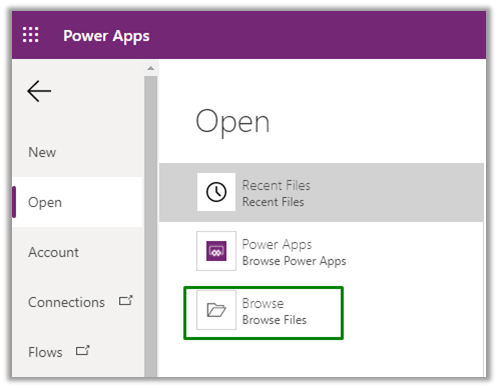
7. Click on File > Open >Browse (Browse File). Browse the extracted file in Power Apps Studio and upload it.
8. After adding the extracted file, click “Don’t Save” and now you are ready to use “Power App Studio”.
9. To use the Prebuilt custom Vision on Power Apps click “Ask for access”. An email window will open where you can ask the developer of the Custom Vision to grant access to a particular tenant. (Note: There might be a cost associated with the Custom Vision service.)
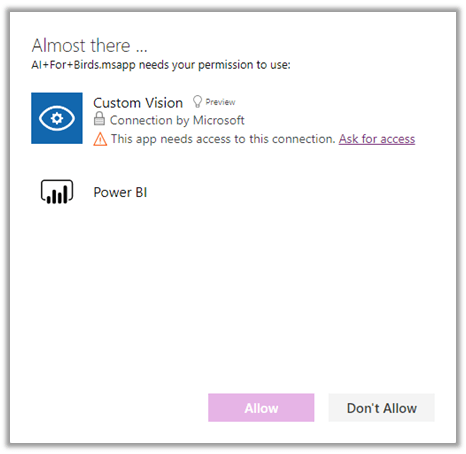
10. Once access is granted from the developer of the app, you can use the Custom Vision API on your Power Apps.
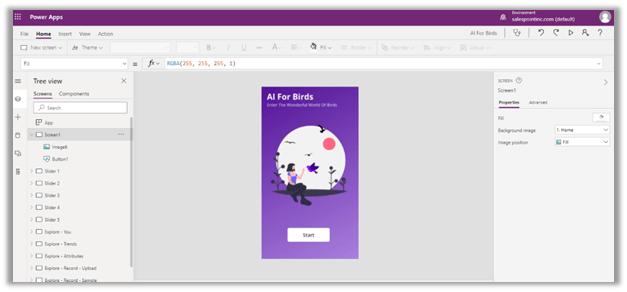
11. After modifying the App, you can save/publish it and view it on your phone.
How to download Power Apps on your Mobile Devices (Android/iOS):
The Power Apps application is available through the Apple App Store and the Google Play Store.
- Download the Power Apps from here. (For Android | For iOS)
- Sign in with your credentials.
- Use the App on your mobile phone.
In this blog, we have seen how easy it is to create power Apps and use it with Custom vision API.
I hope that this blog helps you see how to use custom vision API, Power BI and Power Apps to create a real world application like ‘aiforbirds’.
Using this app, you can easily find the answer to the question, “What type of bird is that?”
Explore bird statuses and trends with maps, species information, and some fun facts. Go to: http://aiforbirds.com/ for the webapp and “AI for Birds” in the App store for the phone app.
Thank you for your time. Good luck!
Sources:
- https://www.customvision.ai/
- https://docs.microsoft.com/en-us/azure/cognitive-services/Custom-Vision-Service/overview
- https://azure.microsoft.com/en-us/services/cognitive-services/custom-vision-service/
- https://docs.microsoft.com/en-us/azure/cognitive-services/custom-vision-service/getting-started-build-a-classifier
- https://www.tutorialspoint.com/power_bi/index.htm
- https://en.wikipedia.org/wiki/Microsoft_Power_BI/


